Use variables for advanced filtering

The Serenytics engine allows you to define variables to filter the content of a dashboard (or a PDF report). These variables are powerful: you can use them to filter widgets (e.g. for partial filters), to filter a dashboard globally, or as variables in your datasources' formulas. These variables can also be passed to your automations to run customized code (e.g. run a Python code with variables taken from user's inputs in a dashboard).
This tutorial will guide you through all the options to define variables and the ways to use them.
The different ways to create variables are (each option will be explained later with details):
- As a dashboard variable: the variable is constant for a given dashboard. This is useful for example when you create a dashboard for a given year. You can define the year as a variable. Then, you can clone the dashboard and change the variable value to display data for another year.
- As a dynamic filter variable: the variable stores the value selected by the user in a dynamic filter. This is useful to achieve advanced filtering.
- As an input field variable: the variable stores the content of an input field (i.e. a field where the user can type a text). This is also useful to achieve advanced filtering (e.g. filter by users whose name contains a string entered by the user).
- As a login meta-data variable: this is used to filter a dashboard according to a field associated with the logged user (e.g. filter by its business unit).
- As an embedded payload variable: this is used when you embed a dashboard within another application and you need to filter the embedded dashboard.
To create dashboard variables, in the dashboard advanced-options tab, enter the variables in the JSON format, for example:
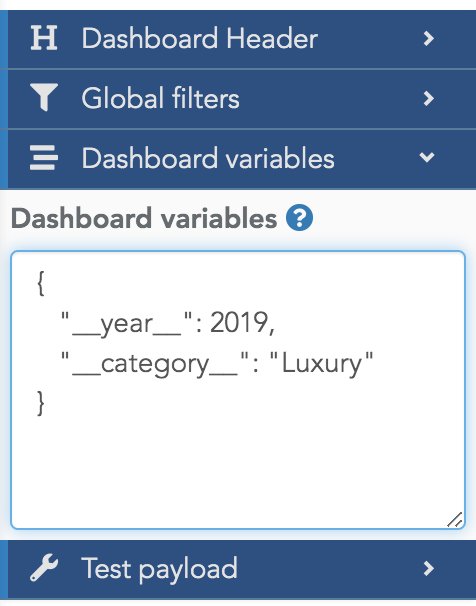
We like to prefix and postfix our variable names with "__". This is a naming convention we like because it helps us to quickly identify variables. But it is up to you to name your variables as you want.
Once you have defined a variable, you can use it in a global filter to filter a datasource in all the widgets of a dashboard. To achieve that, create a global static filter (in the dashboard global options tab), and then, in the filter value, use the {{myVariableName}} syntax:
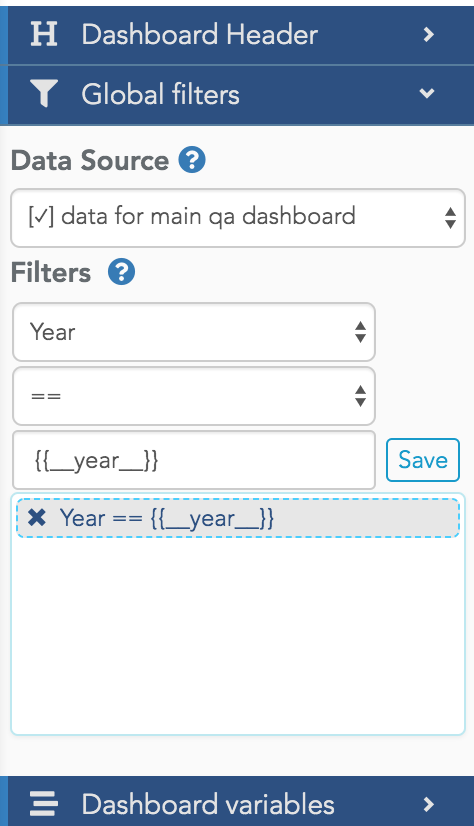
Note that if the variable is not defined, the widgets using this datasource will show an error.
Before passing the variable value to the condition, you can also apply a function to it. For example, if your variable is __year__, you can write {{__year__ - 1}} to get the value of last year or even use formulas such as: {{dateAdd(__yearMonthVar__, 2, "months")}} (see here for the full list of functions).
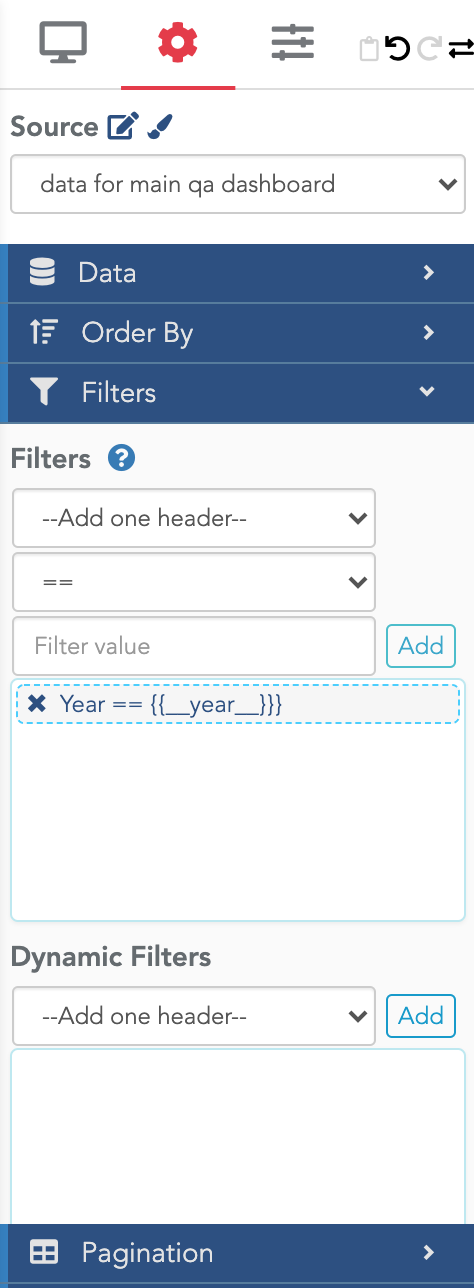
Following the exact same principle, you can also use the variable to filter a single widget:
Once a variable is defined, you can also use it in the formulas editor on a datasource. A variable can be retrieved with the syntax: {{myVariableName}}.
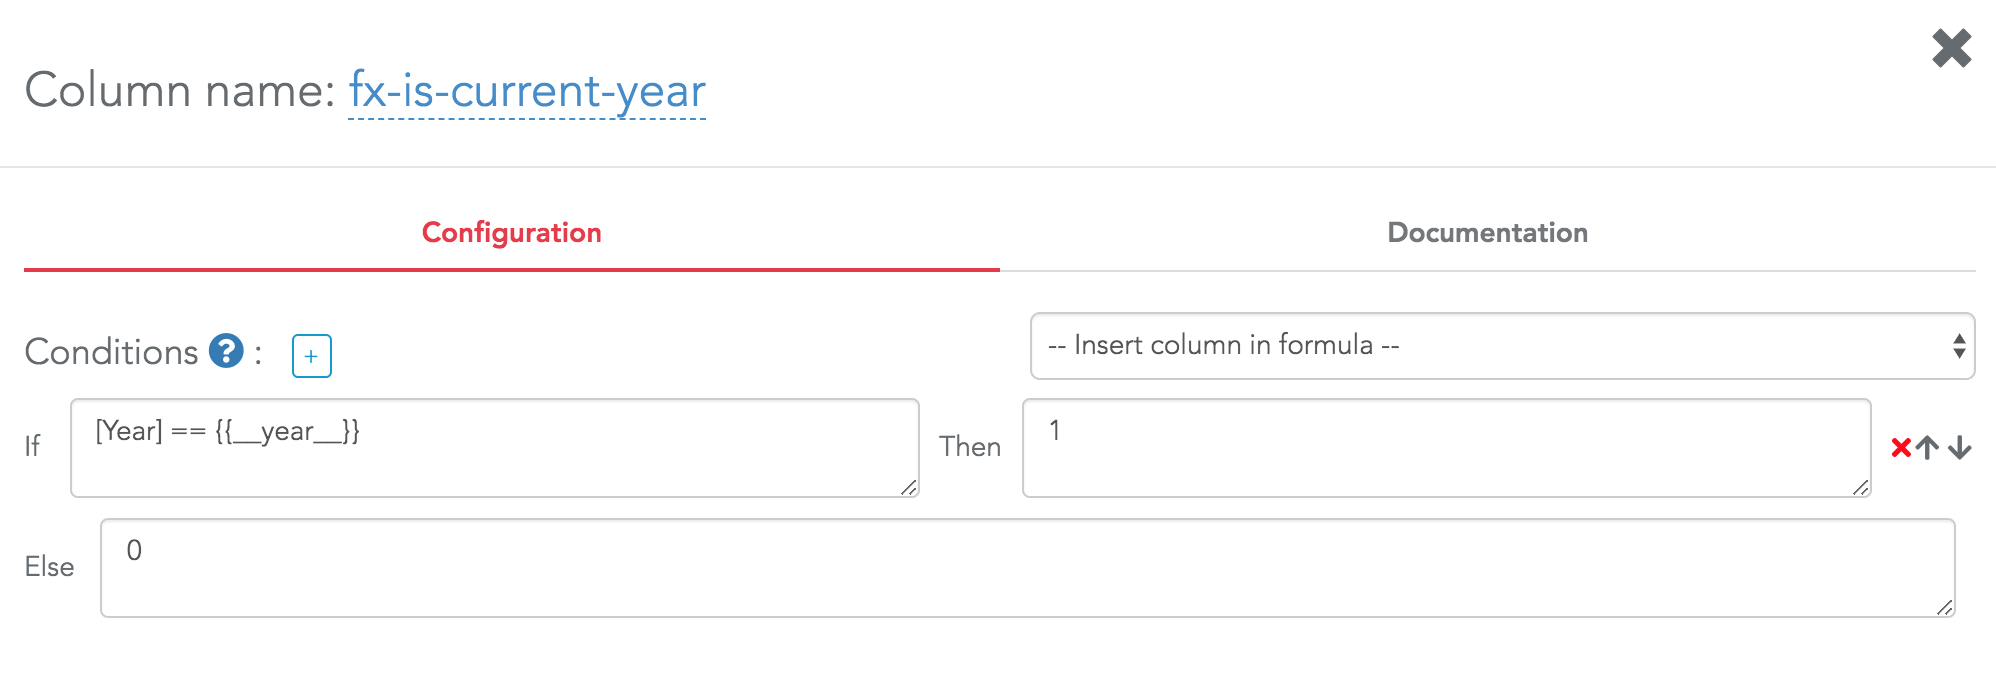
You can apply any datasource function on this variable value. For example, you can write {{myVariableName}}-1, or extract_date_part({{myVariableName}}, "year").
Pay attention that the syntax is slightly different from formulas in dashboards. In a datasource formula, you need to write {{myVariableName}}-1. You cannot write {{myVariableName-1}}.
So far, you cannot set the value of your variable in the formula editor. As a consequence, the formula preview in the editor will show an error. You need to check the result of the formula within a dashboard where the variable value is defined.
When you create a dynamic filter, instead of directly applying the value selected by the user to filter the widgets, you can configure the filter to only store the value in a variable. Click on the cog icon beside the filter name, and enable the "store selected value as variable" option:
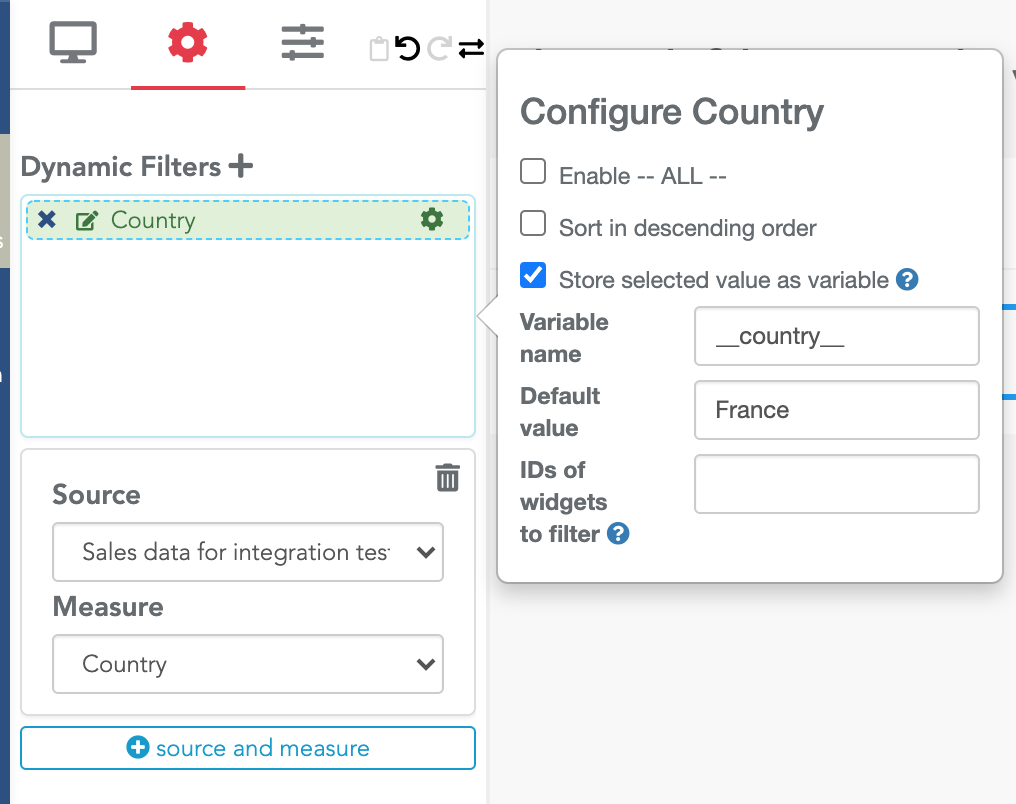
Exactly as in previous examples, this variable will be available in widgets' static filters, in the dashboard's global filters, and in the datasources' formulas.
You can use this option to create a table with data from a year and from previous year, and let the user choose the year. To do that:
- create a dynamic filter on the column "year" from your data
- store its value in a variable
- create a formula (conditional column) in the datasource to get the revenue only if the year of purchase is the variable value (i.e. if [year]=={{__yearVar__}} THEN [revenue] ELSE 0)
- create a second formula in the datasource to get revenue of previous year (i.e. if [year]=={{__yearVar__}}-1 THEN [revenue] ELSE 0)
- create a table, using for example a groupby Category, and select the two formulas you just created
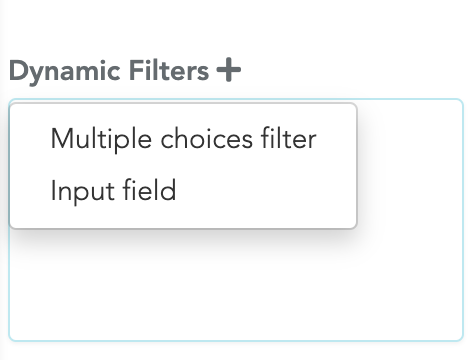
To create an input field, click on the filter icon to create a new dynamic filter widget. Then, choose "Input field" in the popup menu that appears when you create a new entry in this filter:
Then, choose the variable's name:
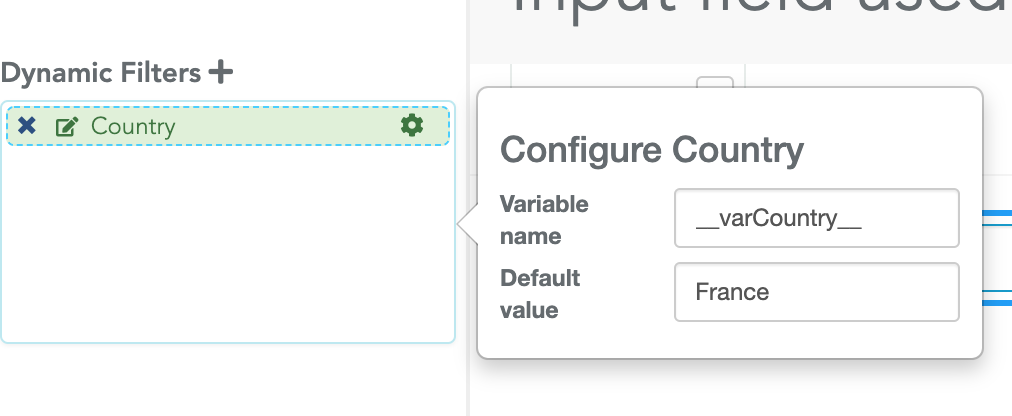
Once you have done these steps, the corresponding variable will be filled by the content entered by the user in the input field. You can use it in the same manner as any other variable.
When the input field is empty, the engine considers that the user does not want to filter anything.
Using input fields, you can create a partial search filter. Let's say you have a datasource of users' purchases, and each user has an email. You can create an input field and store its content in the variable __emailFilter__. Then, you can create a filter in a widget with:
- the column "email" from the datasource
- the operator "contains"
- the value {{__emailFilter__}}
With this feature, you can filter a dashboard according to a user's property (e.g. its business unit). See here for the dedicated section of our documentation for this topic.
When you use the custom HTML mode for your dashboard header, you can use variables in your title. It uses the same syntax as in previous examples. So you can have this dashboard header:
<div> This dashboard is for business unit: {{__businessUnitVar__}}</div>
Warning: variables passed with an embedded payload are not yet available in the title. They will be in a future release.
This feature is useful when a dashboard is only focused on a particular subset of the data (e.g. sales of a given business unit) and should be opened by a click in a table in another dashboard (e.g. showing the sales for all business units in a table).
To do that, you first need to create a dashboard to show the sales for a given business unit. This dashboard uses the variable __businessUnitVar__ in its title and to filter its widgets. You can use the Test Payload json field to test your dashboard. Without specifying a test value for your variable, the widgets will show an error as the variable is not defined.
Then, you need to create a second dashboard with a table showing sales aggregated by business unit. In this table, create a new formula column and use the formula link_to_dashboard (see doc here) in its rendering formula.
link_to_dashboard("Focused dashboard", "176a8ac8-5c85-4fd0-b960-bad858f986e0", "new", "__businessUnitVar__", line[2])
In the above formula:
- The first parameter is the text showed by the link. To show a custom text, you could use "line[x]" or "value" to get data from other columns of your table.
- "176a8ac8-5c85-4fd0-b960-bad858f986e0" is the ID of the dashboard to open.
- "new" specifies that the dashboard will be opened in a new tab.
- "__businessUnitVar__" is the name of the variable to pass to the second dashboard.
- line[2] is the value that will be used in the variable. In this example, the second column of the table must contain the business id or name (whatever is used to filter the second dashboard). A common practice is to filter on technical IDs (in this case, you usually want to enable the "hide measure" option on this ID column in the table so the user doesn't see it).
In this new column, there will be a link that redirects the user to the dashboard per business unit with the __businessUnitVar__ filled according to the table row. This is a powerful way to create a main dashboard showing aggregated data and links redirecting to more focused dashboards.
Let's say you have created a dashboard for your sales team. You have created a single dashboard which is filtered by the sales rep login when he opens it, so he sees KPIs only for his own sales, not from other sales rep.
If you want to send such filtered reports by email, in PDF. You need to provide the variables' values. This is possible in a few lines of a Python script:
import serenytics
client = serenytics.Client()

subject = "Here is your weekly report"
recipients= ['contact@serenytics.com']
html = "Hello,
 please open the attachment to get your PDF report."
web_app_uuid = 'WEB_APP_UUID'

payload = {
'__myCountry__': 'FRANCE'
}

client.send_email(subject=subject, recipients=recipients, html=html, web_app_uuid=web_app_uuid,
dashboard_payload=payload)
When variables are defined on a dashboard and you create an action button to trigger a Python script, variables are passed to the Python code.
Variables can be retrieved in the "script_args" of the Serenytics client object.
Let's build an app to send a dashboard in PDF to a recipient typed by the dashboard viewer.
First, create a Python script with the following code:
import serenytics
client = serenytics.Client()

recipient = client.script_args.get('__email__')

subject = "Here is your weekly report"
recipients= [recipient]
html = "Hello, please open the attachment to get your PDF report."
web_app_uuid = WEB_APP_UUID

client.send_email(subject=subject, recipients=recipients, html=html, web_app_uuid=web_app_uuid)
Then, create a dashboard with an input field, storing its value in a variable named "__email__". And add an action button to trigger the Python script you've just created:
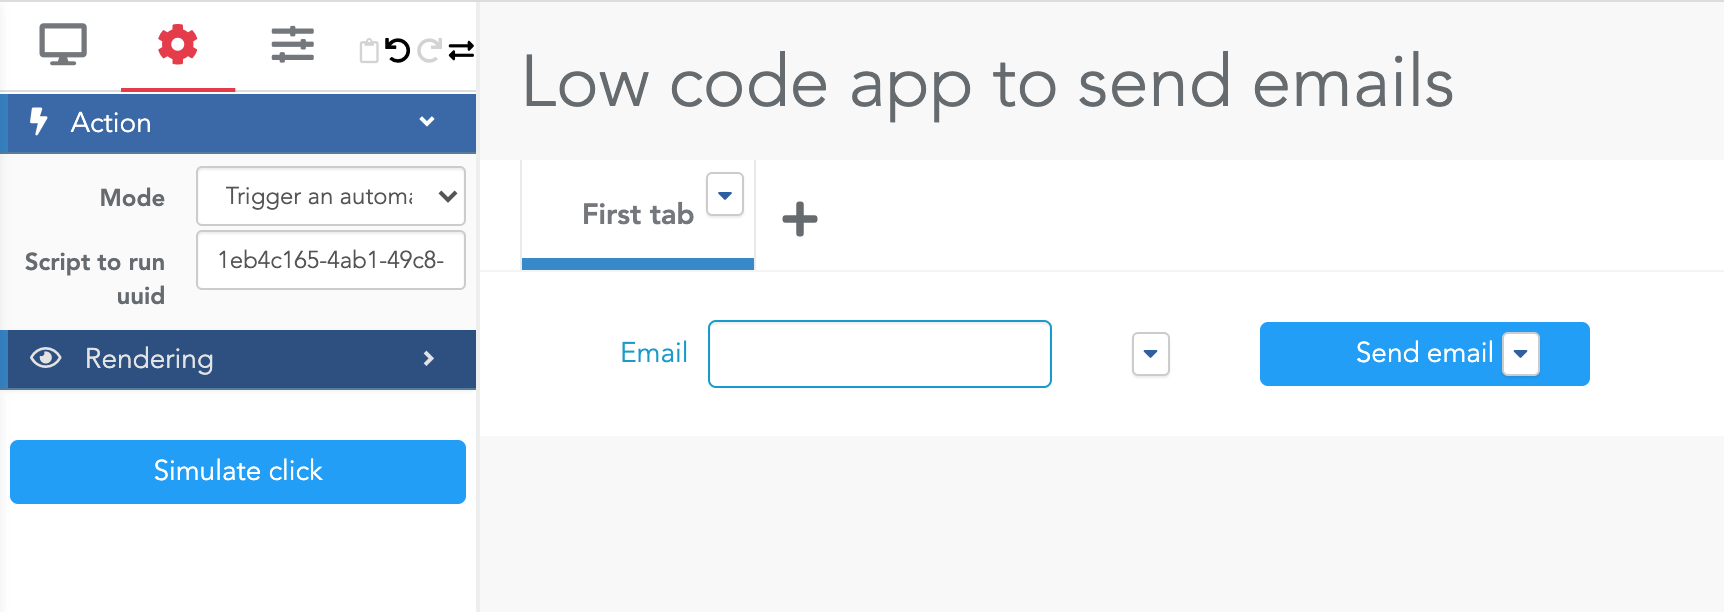
If you open this dashboard in Viewer mode, type your email in the input field and click on the button, you will soon receive the PDF report by email.
This was a dense overview of how to use variables in your dashboard. If you master it, you will be able to create more advanced dashboards which are getting closer to rich web apps.